Emergency Maintenance Protocol for Rental Properties
October 29, 2026
An emergency maintenance protocol is a written, repeatable process that tells everyone involved what to do in the first minutes, hours and days after a serious problem is reported at a rental: who answers, how the issue is ranked, who gets dispatched, what is recorded and how the case is closed. The goal is simple. Protect people first, stop damage second, and leave a paper trail that holds up with the tenant, the insurer and, if it comes to it, a court. Below is the protocol we recommend, with the reasoning behind each step.
TL;DR
- Define in writing what counts as an emergency: fire, gas or electrical failure, any water leak or sewage backup, no heat or air conditioning, and unsecured entry are the standard categories.
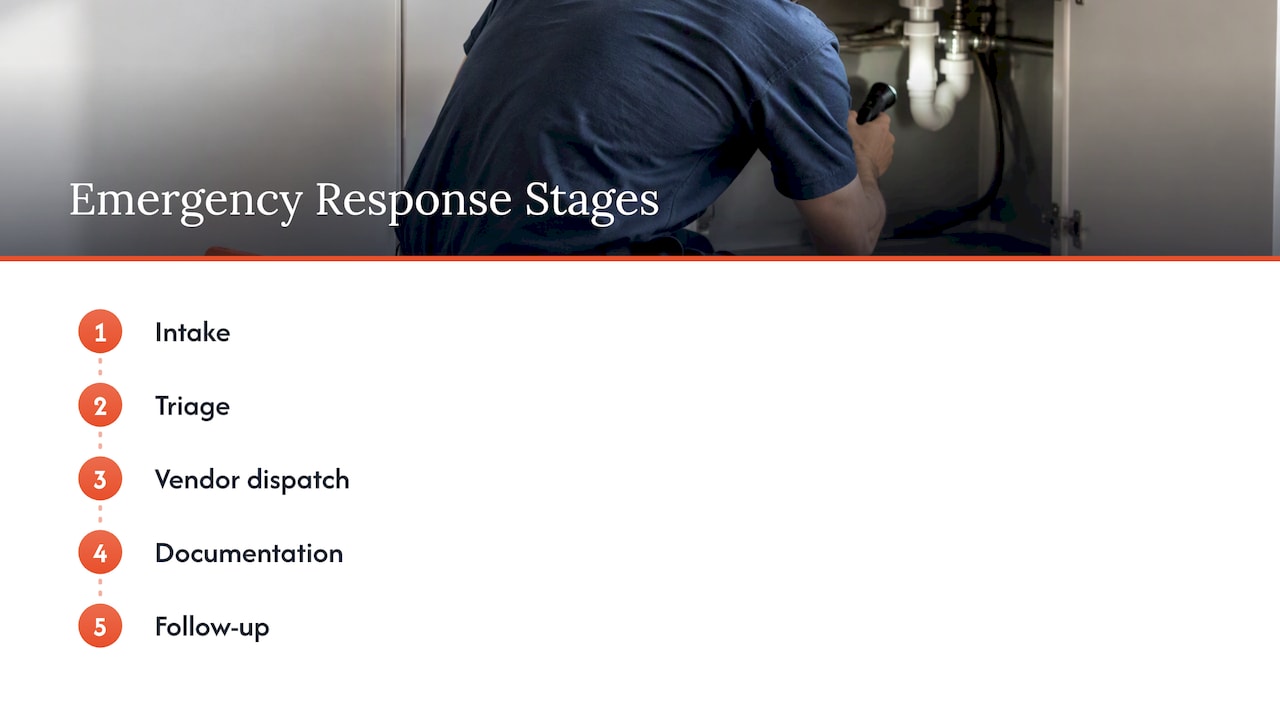
- Run every report through the same five steps: intake, triage, dispatch, documentation, follow-up.
- Life-safety hazards (gas smell, fire, electrical hazard) go to 911 or the utility first, never to a vendor first.
- Photos, timestamps, written acknowledgements and invoices make up the close-out file that protects you with insurers and tenants.
- Review the plan at least once a year and keep backup contacts and backup communication channels.
Table of Contents
- What counts as a maintenance emergency
- The five-step emergency protocol
- What tenants should do first
- Water emergencies and the 24 to 48 hour window
- Your legal footing as a landlord
- Preparing before the emergency happens
- Perspective: what 15 years of managing homes has taught us
- How Auben can take emergency response off your plate
- FAQ
- Sources
What counts as a maintenance emergency
The line between “urgent” and “emergency” is where most protocols fail. If everything is an emergency, vendors charge after-hours rates for a dripping faucet and your team stops trusting the label. If too little is, a tenant sits without heat in January.
The National Apartment Association lists fire, electrical or gas failure, any water leak or sewage backup, no heat or air conditioning, and unsecured entry among maintenance emergencies. That is a sound starting list. Adapt it to your climate and your building types, and put the final version in the lease or the resident handbook so tenants and staff read the same definition.
A practical three-tier split
Most managers find it easier to use three tiers rather than a yes/no test:
| Tier | Examples | Target response |
|---|---|---|
| Emergency | Gas smell, fire or smoke, exposed or sparking wiring, active water leak, sewage backup, no heat in freezing weather, no cooling in extreme heat, broken exterior door lock or window | Immediate action, same hour |
| Urgent | Water heater out, refrigerator failure, a single toilet down in a multi-bath home, a leak that is contained | Same day or next morning |
| Routine | Dripping faucet, sticking door, cosmetic damage, a burned-out bulb | Scheduled within normal service windows |
The response targets are our working standard, not a legal figure. Your lease, local code and your management agreement set the real obligations, so write them down before you need them. For a deeper look at how routine and emergency work differ, see our guide to the three kinds of maintenance a rental will need.
What does not belong on the emergency list
A lost key at 2 a.m. when the home is otherwise secure, a pest sighting, a noisy appliance and a slow drain are inconvenient, not dangerous. Say so in the handbook. Tenants appreciate knowing what will wait until morning, and it keeps the after-hours line free for real emergencies.
The five-step emergency protocol
Government and industry guidance converge on the same skeleton. A city housing handout on rental response describes a defined intake process, triage to categorize urgency, timely acknowledgement of the tenant’s report and thorough close-out documentation as the marks of a professional protocol. We turn that into five steps.
Step 1: Intake through one dedicated channel
Tenants should never wonder where to report an emergency. Publish one number for after-hours emergencies, give it to every resident at move-in, and put it on a card near the electrical panel or the water heater. Routine requests go through the portal; emergencies go by phone, because a person can ask questions and hear urgency in a voice.
The same guidance calls for a dedicated, consistent intake channel. Consistency matters more than sophistication. A single line that is always answered beats three channels that are sometimes checked.
Whoever answers should collect:
- The caller’s name, address and unit, and a callback number.
- What is happening, in the tenant’s words, and when it started.
- Whether anyone is in danger or hurt.
- Whether the tenant can safely do anything to limit damage (see the tenant steps below).
- Whether anyone will be home to give access.
Acknowledge receipt right away and restate the problem back, ideally by text or email as well as on the call. That written restatement is the first entry in your record.
Step 2: Triage by risk to safety and property
Triage is a short decision, not an investigation. The housing handout recommends an objective system that categorizes reports by risk to safety or property and puts life-safety hazards first. In practice, ask three questions in order:
- Is anyone in danger right now? A gas smell, smoke, a fire, a person trapped or sparking electrical equipment means the tenant leaves and calls 911. Utilities such as DTE Energy tell customers who suspect a leak to leave the area immediately and call 911 from a safe place, then the gas company. Your dispatch comes after that, not before.
- Is the property being damaged right now? Active water is the classic case. Every hour of flow adds to the repair bill, so the first priority is stopping the source, then the repair.
- Is the home unsafe or unlivable? No heat in freezing weather, no cooling in dangerous heat, no working exterior lock or no running water all qualify even if nothing is actively being destroyed.
Remote triage often resolves the first move. A tenant who is told where the shutoff valve is can stop a leak before a plumber is on the road, and a tripped breaker is sometimes the whole story. Do not push tenants into anything unsafe. If a task involves a gas appliance, a flooded electrical panel or standing water near outlets, the answer is to stay clear and wait for a professional.
Step 3: Dispatch the right vendor
Match the trade to the problem: a licensed plumber for a burst supply line, an electrician for a hot outlet or failed panel, an HVAC technician for a heat failure, a locksmith or board-up crew for a compromised entry, a restoration company for significant water. The housing handout stresses coordinating repairs with qualified vendors rather than improvising a fix.
Two things make dispatch fast under pressure:
- A ranked vendor list per trade. Keep a primary and at least one alternate for each. IREM’s planning guidance calls for listing response teams, communication procedures, emergency contacts, contractors and alternates in a property-specific plan.
- A spending authority. Decide in advance how much a manager can approve without calling the owner, and write it into the management agreement. An owner who cannot be reached at 1 a.m. should not delay a shutoff.
Tell the tenant what is happening: who is coming, roughly when, and whether they need to be home. Rapid communication of repair status is part of the protocol, not a courtesy. Your phone tree should also have a fallback. Guidance for property managers recommends consistent, calm communication channels and a backup system if primary equipment fails.
Our own approach to vendor choice is covered in how a property management company handles maintenance requests.
Step 4: Document everything as it happens
Documentation is the step that gets skipped when the crisis feels over, and it is the one that matters most months later. One rental-software blog notes that landlords often focus only on the physical fix, when immediate documentation is equally critical for insurance and legal protection.
A complete close-out file includes:
- The original report with date and time.
- The written acknowledgement and your restatement of the issue.
- Photos and video of the condition before, during and after the repair.
- Vendor dispatch time, arrival time and completion time.
- Access logs showing who entered the home and when.
- The invoice and proof of payment.
- Every message to the tenant and owner.
The city handout asks for timestamps and photos, written acknowledgement and a close-out file with requests, invoices, access logs and photos. If insurance is involved, IREM advises documenting the event, response, impacts, communications, recovery and expenses and filing claims according to the insurer’s own process. Read the policy’s notice requirements before an event, not after.
Invoices deserve their own discipline. A clean invoice shows labor, parts, trip charges and after-hours premiums line by line; we explain what to look for in what a maintenance invoice should show.
Step 5: Follow up and close the loop
Emergency repairs are often temporary. A plumber stops the leak and leaves; a drywall crew and a moisture check still have to follow. The protocol should end with a follow-up that confirms the repair addressed the underlying cause, not just the symptom.
A good close-out checklist:
- Call or message the tenant within a day or two and ask whether the problem is truly resolved.
- Schedule any permanent repair work and give the tenant a date window.
- Review the cause. A recurring clog points to a line problem; a second heat failure points to an aging system.
- Update the owner with a short summary, the cost and any recommendation.
- Add the lesson to the plan if the process stumbled.
Repeat failures are expensive in another way too. We have written about how repeat repairs put lease renewals at risk.
What tenants should do first
A good protocol includes the tenant’s part. Put these steps in the move-in packet and repeat them in a short text when a report comes in.
- Get safe. For fire, smoke, a gas smell or an electrical hazard, leave the home and call 911 from outside. Do not turn switches on or off or use a phone inside if you smell gas.
- Stop the source if it is safe. For a water leak, close the nearest shutoff valve. Individual valves are usually under sinks and behind toilets, and a unit’s main valve is commonly near the water heater or where the supply line enters the home. Stay away from standing water near outlets and appliances.
- Call the emergency line, not the portal. Give the address, what happened and whether you are safe.
- Photograph the damage. Take pictures of the source and affected belongings before moving things where you can do so safely.
- Confirm in writing. A short text or email after the call creates a timestamp and avoids disputes later.
- Give access. Let the vendor in or arrange access ahead of time.
Tenants also carry duties. Under Massachusetts rules, for example, tenants are responsible for keeping the unit sanitary and notifying the landlord of major damage immediately, and that principle shows up in most leases. If you want help keeping the home in good shape between emergencies, share our tips on getting tenants to care for a rental home.
Water emergencies and the 24 to 48 hour window
Water is the most common and most costly emergency, and speed decides the outcome. The EPA says that drying the home and removing water-damaged items is the most important step in preventing mold, and that if things cannot be dried within 24 to 48 hours, you should assume mold growth.
For your protocol, that means:
- Dispatch a restoration crew with drying equipment the same day for anything beyond a small, contained spill.
- Record moisture readings and photos at the start and end of drying.
- Do not mix cleaning products. The EPA specifically warns against combining bleach and ammonia, and says to get qualified professional help when cleanup may be too difficult or dangerous.
- Fix the water source completely before closing walls.
If mold appears or the tenant reports health symptoms, treat it as a new case with its own triage and documentation, and involve a qualified professional rather than a handyman.
Your legal footing as a landlord
Emergency response is not only good practice. It is tied to your duty to keep the home habitable, and that duty varies by state and sometimes by city.
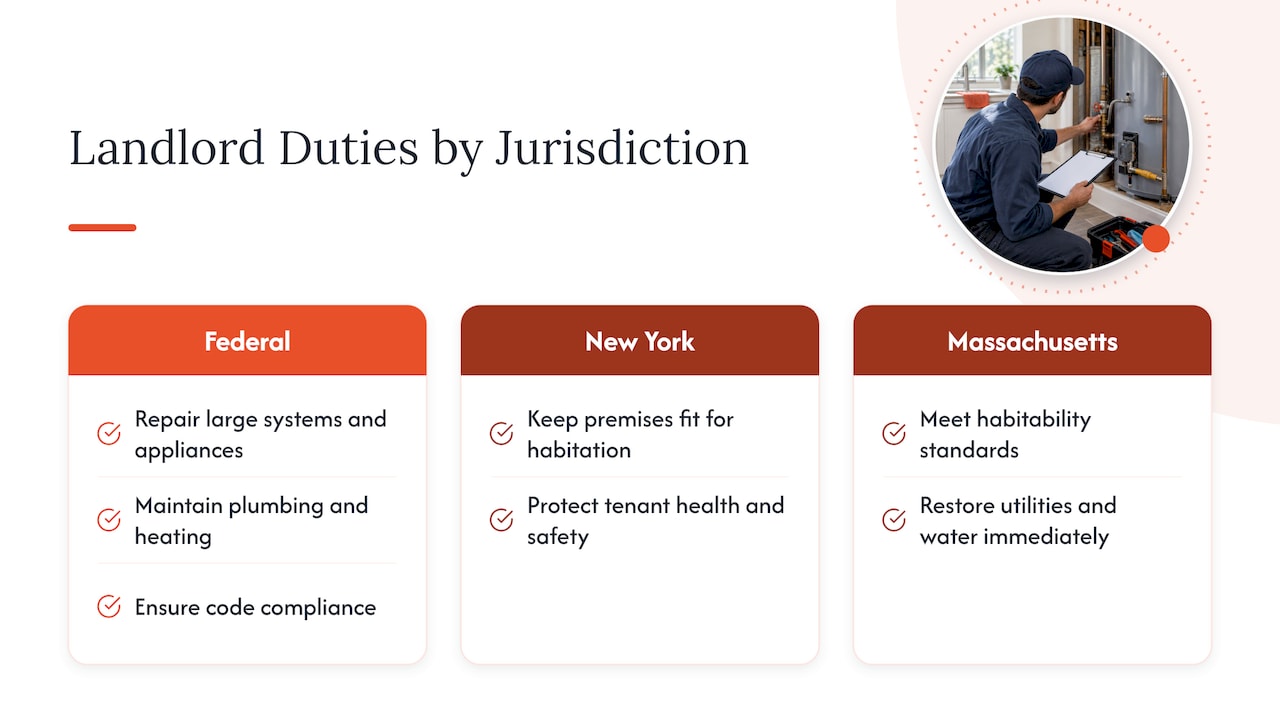
At the federal level, HUD’s training materials describe typical landlord responsibilities: making repairs soon after a work order, repairing or replacing large systems and appliances, maintaining plumbing and heating, and ensuring code compliance. State law adds the detail. New York, for instance, implies in residential leases a warranty that the premises are fit for human habitation and protect against conditions materially affecting tenants’ health and safety. Massachusetts regulations require owners to meet habitability standards and take immediate steps to restore essential services such as utilities and water.
Those are examples, not a universal rule. If you own in South Carolina, Texas, Missouri, Kansas or Florida, check your state’s landlord-tenant statute and any local housing code, and ask a local real estate attorney how your lease should describe emergency response times. A written protocol that you actually follow is also your best evidence that you acted promptly.
Preparing before the emergency happens
The cheapest emergency is the one that does not occur, and the second cheapest is the one you rehearsed.
- Write a property-specific plan and update it yearly. IREM recommends creating a plan for each property, updating it at least annually and communicating it to affected parties.
- Label shutoffs. Tag the main water valve, the gas shutoff and the electrical panel, and photograph their locations for the file.
- Inspect on a schedule. Water heaters, supply lines, HVAC filters, smoke detectors and roof penetrations are where emergencies start. Our fall maintenance checklist is a good seasonal template, and routine maintenance is what keeps the emergency list short.
- Winterize and cool-proof. Know which homes have exposed pipes, old HVAC systems or attic equipment, and service them before the hardest weather.
- Track equipment and work orders in one system. Even a simple maintenance management list helps teams see what has been serviced, what is due and who did it.
- Automate the repetitive parts. Acknowledgement texts, vendor reminders and status updates are good candidates, and property management automation is worth reviewing for what to tackle first.
- Run a tabletop drill. Once a year, pick a scenario such as a Saturday-night pipe burst and walk through the five steps with staff and vendors. Gaps show up fast.
Perspective: what 15 years of managing homes has taught us
We have managed 2,700 properties across 10 regional markets, and the pattern repeats: emergencies rarely fail because of the repair. They fail because of the first thirty minutes, when nobody is sure who owns the problem, or because the paperwork was never done.
That is why we organize our teams in pods, so a small group knows the homes, owners and residents in its area. It is also why we keep maintenance in-house and select vendors transparently. When something goes wrong, the person who answers should already know the property, the tenant and the right tradesperson, and the owner should see exactly what was done and what it cost.
Our view on owners who self-manage: the protocol matters more than the phone number. Write it, share it with your tenants, and rehearse it. If you cannot staff a response around the clock, hand the process to someone who can. Fewer surprises mean better resident retention, and retention is where long-term returns come from.
— MediaBeast
How Auben can take emergency response off your plate
If you would rather not carry the phone at midnight, our property management service covers maintenance coordination, vendor dispatch and the documentation described above for single-family, multi-family and build-to-rent homes across our markets. Investors who want the numbers behind recurring repairs can pair it with our asset management work. To talk through your portfolio, start at aubenrealty.com.

FAQ
What qualifies as a maintenance emergency?
The National Apartment Association lists fire, electrical or gas failure, any water leak or sewage backup, no heat or air conditioning, and unsecured entry. In short, it is anything that threatens safety, makes the home unlivable or is actively damaging the property. Put your own list in the lease so tenants and staff agree.
What are the steps of an emergency maintenance protocol?
Intake through a dedicated channel, triage by risk, dispatch of a qualified vendor, documentation of the timeline, photos and invoices, and a follow-up to confirm the root cause was fixed. Communication with the tenant runs through all five steps.
How fast should a landlord respond to an emergency?
There is no single national number. HUD describes landlords as making repairs soon after a work order, and state and local codes set the specifics. Many managers aim to act within the hour on true emergencies. Check your state’s statute and your lease, and ask a local real estate attorney if you are unsure.
Should a tenant call 911 or the landlord first?
For fire, smoke, a gas smell or an electrical hazard, leave and call 911 first, then notify the property manager. For a contained problem such as a leaking pipe, call the emergency maintenance line right away and shut off the water if it is safe to do so.
How do I reduce emergency repairs in my rentals?
Inspect on a schedule, service major systems before each season and replace aging equipment before it fails. Keep a written plan, update it at least once a year and rehearse it with your vendors.
Sources
- Maintenance Emergencies Defined, National Apartment Association
- From Repairs to Response handout, City of Ventura
- IREM Emergency Response Playbook
- EPA Homeowner’s and Renter’s Guide to Mold Cleanup After Disasters
- HUD Housing Counselors Training, Module 6.1
- 105 CMR 410.003, Massachusetts regulations
- New York Court of Appeals, implied warranty of habitability
- Emergency Maintenance Requests, VerticalRent
- Natural Gas Emergency, DTE Energy
- Pipe Burst in Apartment, LegalHelp
Recommended
- Property Manager | The Three Kinds of Maintenance Your Rental Property Will Need
- The Importance of Routine Maintenance in Rental Property Management | Columbia, SC
- How a Property Management Company Handles Maintenance Requests | Lexington
- A Fall Maintenance Checklist For Homeowners By Our Property Management Company